To confirm your pool filters operate efficiently, you’ll want to follow a regular cleaning schedule. Start by gathering necessary tools and supplies, like Trisodium Phosphate powder and Muriatic Acid, and identifying when to clean the filter based on water pressure or flow rate changes. Disassemble and rinse the filter, then soak it in a TSP solution to break down dirt and grime. Clean the filter housing thoroughly, and give the filters a final rinse before reinstalling and lubricating the seals. By following these best practices, you’ll prevent damage, prolong filter lifespan, and keep your pool water sparkling; now, get into the details of each step to perfect your cleaning routine.
Key Takeaways
- Identify when to clean the filter by monitoring pressure gauge readings and flow rate, cleaning every 1-3 months or as needed.
- Disassemble the filter, rinse off loose debris, and soak it in a trisodium phosphate solution to break down dirt and grime.
- Inspect and clean the filter housing and O-rings, replacing them if necessary, and apply a thin layer of lubricant for a proper seal.
- Perform a Muriatic Acid wash, mixing the solution correctly and rinsing thoroughly to remove acid residue and remaining dirt.
Prepare Essential Tools and Supplies
Gather the necessary tools and supplies, including Trisodium Phosphate powder, Muriatic Acid, a plastic trash can, a multi-function hose spray nozzle, silicone paste, a rubber mallet, rags, a 3/8 drive ratchet, and a torque wrench, to guarantee you’re properly equipped to tackle the task of cleaning your pool cartridge filter.
Having these tools at your disposal will certify a thorough and efficient cleaning process.
The Trisodium Phosphate powder serves as a staple cleaning solution, while Muriatic Acid helps eliminate algae, iron, and calcium carbonate buildup.
Mix the Muriatic Acid with water in a 1:20 ratio for peak results.
The multi-function hose spray nozzle will come in handy for rinsing the filter, and the silicone paste will help lubricate the filter’s O-rings.
With these essential tools and supplies, you’ll be well-prepared to tackle the task of cleaning your pool cartridge filter, certifying your pool maintenance routine runs smoothly.
Identify When to Clean the Filter
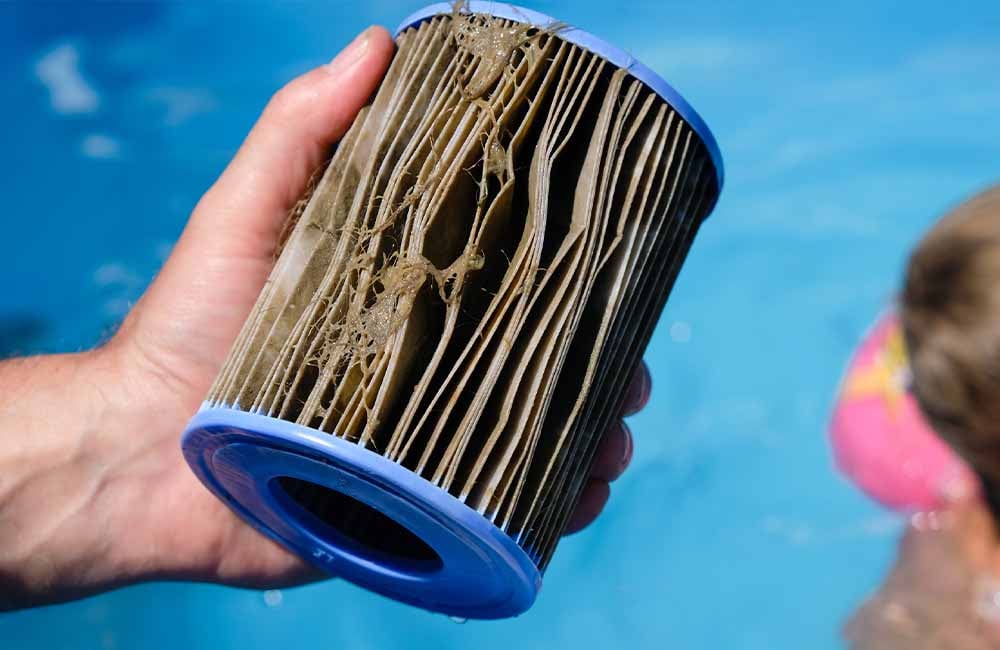
You’ll know it’s time to clean your pool cartridge filter when you notice a significant drop in water pressure or flow rate, usually indicated by a rise in pressure gauge readings or a decrease in the pool’s return jets’ velocity.
This decrease in performance signals that your filter is clogged with dirt and debris, and you need to clean it to restore top-notch function.
Don’t wait to clean your pool filter until it’s completely clogged, as this can lead to damage or even failure.
Instead, check the pressure gauge regularly to monitor the filter’s condition.
Most types of pool filters require cleaning every 1-3 months, depending on usage and environmental factors.
When you notice a 10-15 PSI increase in pressure, it’s time to clean your pool filter.
Don’t wait until the pressure gauge reaches its maximum limit, as this can put undue stress on your pump and other equipment.
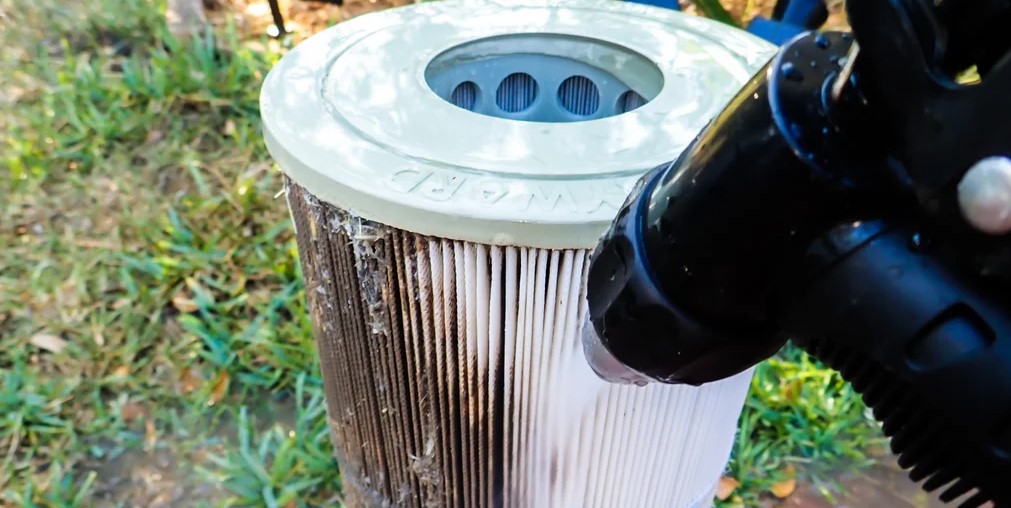
Disassemble and Rinse the Filter
Remove the pool filter from the water and start the disassembly process by rinsing off the loose debris with moderate pressure from a garden hose at a 45-degree angle. This initial rinse helps prevent damage to the filter and loosens large particles.
Next, focus on flushing debris out from between the pleats and brush the pleated surface to remove small particles and debris. Choose a clean spot to minimize clean-up later, such as on grass, to guarantee the area is free from dirt and debris.
As you rinse the filter, pay attention to the cartridge, making sure to remove any visible dirt and debris. Use the hose to rinse the filter from top to bottom, working your way around the entire cartridge.
This thorough rinse will help prepare the filter for the next steps in the cleaning process. By disassembling and rinsing the filter correctly, you’ll set yourself up for success in the subsequent cleaning stages, certifying your pool filter is restored to its peak performance.
Soak Filters in TSP Solution
Now that your filter is disassembled and rinsed, it’s time to soak the components in a trisodium phosphate (TSP) solution.
You’ll need to prepare the solution correctly to guarantee it’s effective, and then allow the filters to soak for the right amount of time to break down dirt and grime.
After soaking, you’ll need to rinse the filters thoroughly to remove any remaining debris and TSP residue.
TSP Solution Preparation
Preparing a TSP solution requires mixing one cup of trisodium phosphate (TSP) with five gallons of warm water, creating a potent cleaning agent to effectively break down dirt and grime that has accumulated on your pool filters.
This cleaning solution is essential for cleaning your pool’s cartridge filters, which can become clogged with debris and reduce the efficiency of your pool’s circulation system.
To create the solution, start by filling a large bucket with five gallons of warm water. Next, add one cup of TSP powder, stirring until it’s fully dissolved.
This solution is specifically designed to target tough contaminants that can affect the performance of your cartridge pool filter.
By soaking your filter in this solution, you’ll be able to clean your filter more effectively, removing dirt and grime that can impede airflow and reduce water clarity.
Remember, regular cleaning is vital to maintaining a healthy and clean pool environment.
Effective Soaking Time
You’ll want to submerge your filters in the TSP solution for at least 3 hours or overnight to allow for effective degreasing and loosening of dirt and debris.
This soaking time is vital to break down stubborn contaminants and grime that can clog your filters.
While 3 hours is the minimum recommended, you may need to soak them for 6-8 hours or overnight if they’re heavily soiled.
The type and amount of debris on the filter will dictate the ideal soaking time, so be prepared to adjust accordingly.
Vital to guarantee the filters are fully submerged in the TSP solution to allow for even cleaning and degreasing.
Remember, the goal is to allow the solution to penetrate deep into the filter’s pores and lift out dirt and debris.
After the soaking time is complete, you’ll be ready to rinse your filters thoroughly with a garden hose to remove any remaining dirt and debris before reinstalling them into the pool filter system.
Rinse Thoroughly After
Following the TSP solution soak, hold the filter at a 45-degree angle and rinse it thoroughly with a garden hose to dislodge and remove any remaining dirt and debris.
Make sure the rinse water flows freely through the pleats to remove any trapped dirt and TSP residue. Use a moderate water pressure to rinse the filters, taking care not to damage the delicate filter media.
You’ll know it’s clean when the water runs clear, indicating that all dirt and debris have been removed.
If the filters are still dirty after the initial rinse, repeat the process. A clean filter is essential for proper pool filtration, so don’t skip this step.
Remember, a thorough rinse is vital to removing all dirt and debris that can affect the filter’s performance. By following these steps, you’ll guarantee your pool filter is clean and functioning efficiently.
This won’t only keep your pool water clean and clear but also reduce the risk of damage to your pool’s plumbing and equipment.
Clean the Filter Housing Thoroughly
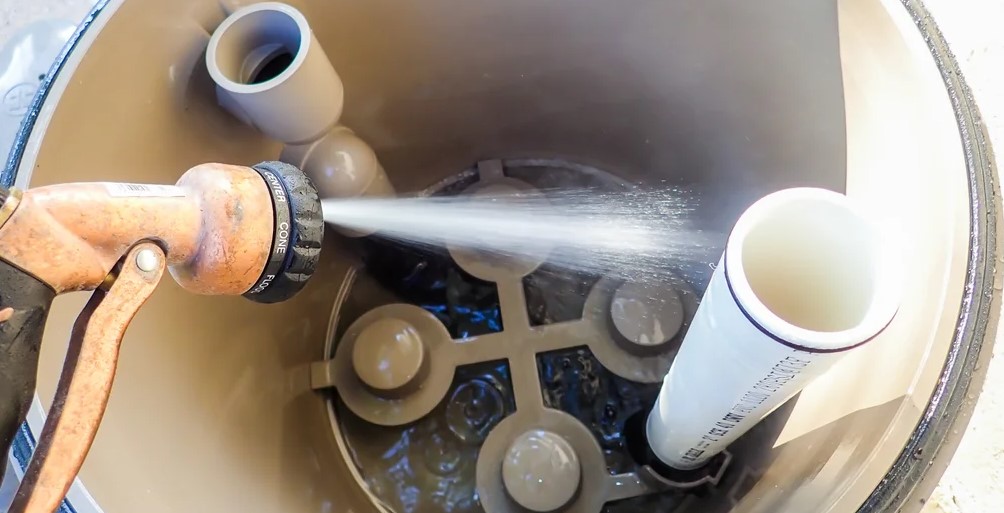
Turn off the pump and relieve the pressure in the system before disassembling the filter housing to guarantee a safe and effective cleaning process.
Remove the lid and take out the filter cartridges. Inspect the housing for any debris or dirt that may have accumulated and remove it. Use a cleaning solution to scrub away any stubborn stains or mineral deposits. Rinse the housing thoroughly with clean water to remove any residue.
Next, focus on the O-rings and gaskets. Inspect them for any signs of wear or damage and replace them if necessary. Apply a thin layer of lubricant to the O-rings to facilitate a proper seal.
Reassemble the filter housing, making sure all connections are secure and tightened properly. Regular pool filter cleaning and maintenance are vital to maintaining clean and safe pool water. By following these steps, you’ll be able to clean a cartridge efficiently and effectively, guaranteeing your pool filter runs smoothly and efficiently.
Perform a Muriatic Acid Wash
To remove stubborn scale deposits and mineral buildup that can’t be removed with degreasers alone, prepare a muriatic acid wash solution by mixing 1 part muriatic acid with 20 parts water. This solution will help break down calcium carbonate and other mineral deposits that can clog your pool filter.
When handling the muriatic acid, be sure to wear protective gear, including gloves and eye protection, to prevent skin and eye irritation.
Soak the filters overnight or until the bubbling stops, then rinse them thoroughly to remove any remaining acid residue.
When performing a muriatic acid wash, keep in mind:
Wear protective gear to prevent skin and eye irritation
Mix the acid solution correctly to avoid damaging the filters or surrounding surfaces
Soak the filters for the recommended amount of time to guarantee effective cleaning
Rinse the filters thoroughly to remove any remaining acid residue
Neutralize the acid solution by adding baking soda or ammonia to prevent damage to surrounding surfaces or the environment
Give Filters a Final Rinse
Now that you’ve completed the muriatic acid wash, you’re ready to give your filters a thorough final rinse to remove any remaining dirt or debris.
Grab a garden hose with a spray nozzle and thoroughly rinse the filters, making sure to flush out any remaining acid or cleaning solution. Pay special attention to the pleats and crevices, where dirt and debris tend to accumulate.
Use a soft-bristled brush to gently scrub away any remaining dirt. Rinse the filters until the water runs clear, indicating that all dirt and cleaning solution have been removed.
A thorough final rinse is vital to prevent any remaining dirt or debris from re-depositing onto the filter surfaces during the next filtration cycle. Take your time and make sure to rinse every inch of the filters.
You want to guarantee that your filters are completely clean before reinstalling them. By doing so, you’ll extend their lifespan and maintain peak pool water quality.
Reinstall and Lubricate the Seals
Now that your filters are sparkling clean, it’s time to focus on reinstalling and lubricating the seals.
You’ll want to carefully inspect the seals for any signs of wear or damage, then reinstall them using proper techniques to guarantee a tight seal.
Next, you’ll apply a thin layer of silicone paste to keep them running smoothly and prevent future issues.
Seal Inspection Essentials
You’ll need to carefully examine the seals for signs of wear, cracks, or damage before reinstalling them, as faulty seals can compromise the entire filtration system.
A thorough seal inspection is vital to guarantee the peak performance of your pool filter, whether it’s a diatomaceous earth (DE) filter, sand filter, or Pool Filter Cartridge.
When conducting a seal inspection, be sure to:
- Check for signs of wear, such as cracks, tears, or brittleness
- Inspect the seal’s surface for mineral buildup or corrosion
- Verify that the seal is properly seated and aligned
Refer to your filter’s manual for specific seal inspection and maintenance recommendations
Proper Reinstallation Techniques
To guarantee a secure and watertight seal, reinstall the filters by first positioning the bottom seal plate correctly, then apply a thin layer of silicone paste to the seals according to the manufacturer’s instructions.
This verifies the seals are properly conditioned and ready for reassembly. Next, inspect the seals for any signs of damage or wear and replace them if necessary, using the correct replacement parts to guarantee a proper fit and seal.
When reassembling the housing, make sure to reinstall the clamp and tighten the bolt to the recommended torque spec.
This prevents damage to the filter or housing and verifies a secure connection. Double-check all connections and seals to guarantee they’re secure and properly aligned before starting up the pump.
This prevents air leaks and verifies proper filter function. By following these proper reinstallation techniques, you’ll prevent damage, guarantee a watertight seal, and get your pool filter up and running efficiently.
Silicone Paste Application
When applying silicone paste to the seals, follow the manufacturer’s instructions for the correct amount and application method to guarantee a thin, even layer that effectively lubricates and conditions the seals for peak performance.
To secure prime results, keep in mind the following key points:
Verify compatibility: Make sure the silicone paste is designed for use with your specific pool filter cartridges to avoid damaging the seals or compromising the filter’s performance.
Clean the seals: Before applying silicone paste, confirm the seals are free of dirt, debris, and old lubricant residue to establish a strong bond and prime performance.
Use the right amount: Apply the recommended amount of silicone paste to avoid over-lubricating, which can attract dirt and debris, reducing the filter’s efficiency.
Lubricate moving parts: Apply silicone paste to moving parts, such as O-rings and gaskets, to reduce friction and wear, ensuring smooth operation and extending the lifespan of your pool filter.
Inspect and reapply: Regularly inspect the seals and reapply silicone paste as needed to maintain prime performance and prevent damage to your pool filter and cartridges.
Reassemble the Filter Housing
With the cleaning and maintenance tasks complete, reassembling the filter housing is the next crucial step in restoring your pool filter to peak functioning. You’ll need to verify the bottom seal plate is properly positioned to prevent leaks or damage. Next, clean and lubricate the seals with silicone paste, applying a thin, even layer to recondition them and aid in sealing. Check the condition of the seals and replace them if necessary, using correct replacement parts for a proper fit and seal.
| Step | Action | Important Notes |
|---|---|---|
| 1 | Reassemble housing | Hand tighten clamp in star pattern |
| 2 | Check seals | Replace if necessary, use correct parts |
| 3 | Apply silicone paste | Thin, even layer for proper sealing |
| 4 | Tighten bolt | Use torque wrench, follow torque spec |
Maintain and Replace Filters Regularly
You must maintain and replace your pool filters regularly to guarantee peak pool performance, prevent safety hazards, and extend their lifespan. Failing to do so can lead to decreased efficiency, cloudy water, and even safety risks like algae growth.
Inspection is key: Regularly inspect your sand filters for signs of replacement need, such as cloudy water despite balanced water chemistry.
Clean and maintain: Clean your sand filters regularly to prevent clogged or contaminated sand beds, which can cause cloudy water.
Replace filters on time: Replace cartridge filters every 3-5 years, depending on pool usage, and replace sand every 3-5 years.
Use the right cleaning solution: Use a suitable cleaning solution to clean your filters, and make sure to follow the manufacturer’s instructions.
Monitor water chemistry: Keep an eye on your pool’s water chemistry to confirm it’s balanced and safe for swimmers.
Frequently Asked Questions
How Often Should a Pool Filter Be Cleaned?
You should inspect your pool filter regularly to guarantee peak filter efficiency and extend its lifespan, but the exact cleaning schedule depends on the filter type, loading, and pool maintenance needs, so monitor pressure gauges closely.
What Is the Best Way to Clean Pool Filters?
As you plunge into the world of pool maintenance, you’re about to uncover the secrets to sparkling clean filters. Reach for a filter brush to scrape off debris, then delve into cartridge cleaning, backwashing tips, and inspecting the filter grid for a thorough chemical cleaning and maintenance routine.
How Long Should I Soak My Pool Filter in Muriatic Acid?
When soaking your pool filter in muriatic acid, you’ll need to ponder the acid concentration, filter material, and size, as well as the filter’s age and cleaning frequency, to determine the ideal soaking duration.
What Can I Spray on My Pool Filter to Clean It?
You’re likely aware that 70% of pool filter failures are due to improper cleaning. To effectively spray clean your pool filter, use specialized filter sprays, cleaners, degreasers, sanitizers, protectants, enhancers, or revivers, ensuring a thorough rinse to prevent damage and maintain top-notch performance.
Conclusion
You’ve made it through the arduous task of cleaning your pool filters – congratulations!
Now, go ahead and pat yourself on the back, because you’ve earned the right to swim in a pool that’s only 90% likely to give you a skin rash.
Remember, regular filter cleaning is key to avoiding a pool that’s more swamp than oasis.
So, don’t slack off – stick to these best practices and you might just make it through summer without a filter-induced crisis.

I’m Max, the founder and chief pool enthusiast behind Pool Pro Tips. As a passionate pool owner and cleaning expert, I created this website to share my knowledge and experience with you, helping you to keep your pool sparkling clean and safe for years to come.